
Home / Treatments / Body contouring / Process
Body · Process
Body contouring and tightening – the process step by step
Tightening operations are major procedures with predictable healing. This is how they typically proceed – using the tummy tuck as an example.

Tightening operations require a stable body weight and good preparation. Using the tummy tuck as an example, the steps show the typical process; for a body lift as well as upper arm and thigh lifts, it is similar.
The process at a glance
- 01a few weeks beforehandPreparation
Examination, planning of incision pattern and extent, preliminary examinations, informed consent.
- 02Day of surgerySurgery
Tightening under general anesthesia; depending on the extent, with an inpatient stay.
- 03Weeks to monthsAftercare
Compression, rest, check-ups; scars mature over months.
What happens during a tummy tuck
Phase 1: Preparation
- Examination Excess skin, tissue quality and abdominal muscles are assessed.
- Weight It should be stable for several months – otherwise the result is not reliable.
- Planning The incision pattern and course of the scars are defined so that they lie under clothing as far as possible.
- Preliminary examinations and thrombosis prevention as instructed by the doctor.
- Smoking stop in good time beforehand if possible – it significantly increases the risk of wound healing problems.
- Informed consent and organization with time to think it over; plan for help during the first few weeks.
Phase 2: The day of surgery
- Marking while standing The incision pattern and the excess to be removed are marked.
- Anesthesia Tightening operations are performed under general anesthesia.
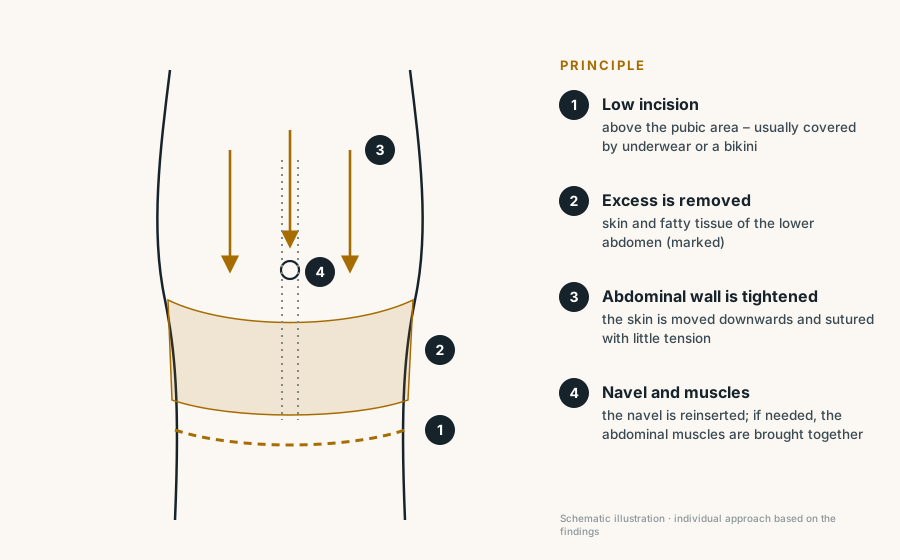
- Procedure Excess skin and fatty tissue of the lower abdomen are removed and the abdominal wall is tightened downwards; if necessary, separated abdominal muscles are brought together and the navel is repositioned.
- Closure Layered suturing, drains if necessary, compression girdle.
- Inpatient stay Depending on the extent, an inpatient stay is necessary.
Phase 3: Aftercare and healing
- Day 1–3slightly bent posture, get up early (thrombosis prevention), drains are removed
- Week 1–2Wound checks; light activities
- Week 3–6Continue wearing the compression girdle; do not lift anything heavy
- from week 6Gradually resume sports – after consultation
- Month 6–12Scars become lighter and flatter
Contact us immediately in case of fever, increasing pain, shortness of breath, calf pain, redness or discharge from the wound.
Your checklist
- Keep your weight stable for months
- Stop smoking in good time
- Have the compression girdle fitted in advance
- Help with the household for the first few weeks
Abdomen, body lift, tightening procedures